You came for important information and now we’ll talk about how and what you can drop into a child’s ears with otitis media - the rules for putting drops in the ears of a newborn and older children. Maybe in your case it was different, but we’ll tell you how it usually happens. Attention, before prescribing diagnoses or medications/treatment for yourself, you should always consult with professional specialists in your field and not self-medicate. Of course, you can quickly find the answer to the simplest questions and diagnose yourself at home. Write your wishes in the comments, together we will improve and supplement the quality of the material provided.
Do I need to cover my child’s ears with compresses after drops?
Immediately after instillation of the ears, you should cover the ear canals with cotton balls so that the medicine does not leak out.
The balls do not need to be pushed into the ear canals!
Do you trust doctors and their prescriptions?
Yes
20.08%
No
13.93%
I trust, but I check all medications for reviews on the Internet from people who have already tried them and only then do I start taking them.
47.95%
Yes, but only to appointments and doctors from paid clinics.
18.03%
Voted: 244
Note to moms:
Many medications are toxic to babies! Therefore, after instilling drops in your child’s ears, you need to monitor any changes in his health – whether there is swelling or redness, difficulty breathing or itching and burning.
Of course, the baby will not be able to tell what is burning and itching in his ears, but from his behavior it will be clear that he is experiencing severe discomfort.
If your condition worsens or if you notice signs of an allergy to the medicine, you should immediately consult a doctor.
- Dry. This option is used to warm the ear and absorb the fluid that flows out during inflammation. It is also used during the recovery stage to warm up the sore area of the ear. Children are often given special “bunny” ears made of white cotton fabric with cotton wool inside to keep them warm during otitis media.
- Wet. Such compresses are not given to infants!
It is equally important to observe a clear procedure time and interval between instillations.
How to put drops in your ears correctly?
No folk remedies, from instilling walnut oil to applying urine compresses, have anything to do with the treatment of ear diseases. On the contrary, they can lead to sad consequences: in the best case, otitis media will become chronic, in the worst case, it can result in hearing loss and purulent meningitis.
So, the diagnosis has been made, treatment has been prescribed, ear drops have been purchased at the pharmacy, all that remains is to instill them correctly by following these steps:
- Wash your hands thoroughly with soap to avoid additional infection of an already sore ear.
- Gently clean the auricle and ear canal from wax and other contaminants using a damp cotton pad.
- Warm the bottle of medicine by holding it in your hand or immersing it in warm water to a temperature equal to body temperature. Cold liquid causes ear irritation and pain, and may cause dizziness. Be careful not to overheat the medicine; hot drops can cause burns to the ear canal and inner ear.
- If the drug is for instillation in the form of a suspension, the bottle must be shaken thoroughly to evenly distribute the active substance in the solution.
- Make sure that the tip of the dropper on the bottle with ear drops does not have chips or cracks that could injure the ear canal. When using a regular pipette, it must first be sterilized by boiling.
- Turn the bottle over so that the medicine is at the tip of the dropper.
- The head should be tilted upward with the affected ear or the patient should be placed on the appropriate side.
- To facilitate the penetration of drops, it is necessary to straighten the ear canal by pulling the ear back and up with your free hand (for a child under two years old - back and down).
- Place the prescribed number of drops into the ear and lightly press the tragus so that the medicine moves along the ear canal.
- Remove excess drops with a turunda.
- To increase the duration of the drug’s effect on the eardrum, it is recommended to lie on the healthy side for 10 minutes or insert a cotton swab into the ear drop.
- After the procedure, you must immediately close the bottle of medicine.
- Wash the hands.
Important: the instilled drug must pass along the outer wall of the ear canal, since direct contact of ear drops directly on the eardrum can cause a sharp increase in pain, dizziness and a headache.
INSTALLING DROPS INTO THE EYES, NOSE, EARS.
Home Favorites Random article Educational New additions Feedback FAQ⇐ PreviousPage 3 of 3
Algorithm for instilling drops into the eyes.
| 1. If possible, establish a trusting relationship with the patient |
| 2. Explained the purpose and course of the procedure, received consent to carry out |
| 3. I treated my hands at a hygienic level. |
| 4. Examined the eyes and assessed the condition. |
| 5. Treated gloves with chlorhexidine solution |
| 6.Checked that the name of the drops corresponded to the doctor’s prescription |
| 7.Took the required number of drops (2-3 drops for each eye). |
| 8. With the patient sitting or lying down, asked him to throw back his head and look up. |
| 9. Pull back the lower eyelid and, without touching the eyelashes (do not bring the pipette closer than 1.5 cm to the eye), drop 1-2 drops into the conjunctival fold of one eye |
| 10.Then do the same for the other eye |
| 12. Blotted the leaking drops with a cotton pad |
| 12. Place used cotton pads in appropriate containers for disinfection and disposal as class “B” waste – disposable. |
| 13.Took off the gloves, immersed them in an appropriate container for disinfection, and then disposed of them as class “B” waste. |
Algorithm for instilling drops into the nose.
If possible, establish a trusting relationship with the patient (parents).
1. Wash and dry your hands and put on sterile gloves.
2. If there is mucus, clean the nasal passages using an electric suction device (rubber can): if there are crusts in the nasal passages, remove them with flagella soaked in sterile oil.
Note: if the secretion is viscous, a solution of furacillin 1:5000 or a 2% solution of sodium bicarbonate is used to liquefy it. An older child should blow his nose without straining, alternately from each nostril.
3. Lay the child down, tilting his head slightly back.
4. Take the medicine into a pipette, lift the tailbone of the child’s nose with your finger and drop into each lower nasal passage as many drops as prescribed by the doctor or recommended according to the instructions.
5. Make sure that the child remains in a lying position for several 1-2 minutes.
6. Immerse the used pipette and rubber can into the disinfectant solution.
7. Remove the mask, gloves, wash and dry your hands.
8. Make a record of the administration of the drug and the patient's response.
Algorithm for instilling drops into the ears.
| 1. Informed the patient about the upcoming procedure and the progress of its implementation. |
| 2. Prepared the necessary equipment: - gloves; — cotton flagella; - sterile pipette; - sterile tray; - non-sterile tray. |
| 3.Layed or sat the patient down, turning his head to the healthy side. |
| 4. I washed my hands using a household method, dried them, and put on gloves. |
| 5. If there is discharge from the ear, clean the ear canal with cotton wool. |
| 6. I took the drops into a pipette and placed one drop on the back of my wrist joint (checking the temperature of the drops). |
| 7. Straightened the external auditory canal: a) if the child is under one year old, pull the earlobe down; b) if the child is older than one year, pull the auricle back and up. |
| 8.Inserted a pipette into the external auditory canal and dripped the number of drops of medicine prescribed by the doctor along the outer wall. |
| 9. Place the pipette in the waste tray. |
| 10. Pressed the tragus of the child’s ear several times (with unexpressed pain). |
| 11. Placed a cotton ball in your ear for 10-15 minutes. |
| 12. Warned the child/relatives that the head should remain turned to the healthy side for 10-15 minutes. |
| 13. He took off his gloves, washed and dried his hands. |
15. ENEMA DELIVERY.
Indications: It is prescribed to empty the intestines of feces and gases during constipation and to prepare the patient for endoscopic and radiological methods of examining the abdominal organs.
Contraindications: Inflammatory changes in the rectum, hemorrhoids, etc. For a cleansing enema, use water at room temperature, a pear-shaped balloon with a soft tip or an Esmarch mug, and Vaseline to lubricate the tip.
Cylinder capacity No. 1-30 ml, No. 2-50 ml, No. 3-75 ml, No. 4-100 ml, No. 5-150 ml, No. 6-180-200 ml. The amount of fluid administered depends on the age of the child. Up to 3 months of life, 25-30 ml is administered, from 3 months to 2 years - 10 ml, per 1 month of life, after 2 years, the amount of liquid is calculated by the formula: 240 ml + 20 - 30 per year of life.
The tip of the balloon (Esmarch circles) is inserted carefully to a depth of 3-5 cm for young children and 6-8 cm for older children.
Execution sequence:
If possible, establish a trusting relationship with the patient.
1. Put on an oilcloth apron.
2. Wash and dry your hands and put on gloves.
3. Establish a friendly relationship with the patient.
4. Pour 1.0-1.5 liters of water at room temperature -20-22ºC into Esmarch’s mug; for atonic constipation - water t 12ºC (to stimulate intestinal motor activity), for spastic constipation - water t 40ºC (to relieve spasm of the intestinal muscles).
5. Hang Esmarch's mug on the stand and lubricate the sterile tip with Vaseline.
6. Open the valve on the rubber tube and fill it with water (bleed out the air). Close the valve.
7. Place the patient on his left side with his knees bent and his legs slightly brought toward his stomach on a couch covered with oilcloth hanging into the pelvis.
8. Using the 1st and 2nd fingers of your left hand, spread the patient’s buttocks, and with your right hand carefully insert the tip into the anus 3-4 cm towards the navel, then to a depth of 8-10 cm parallel to the spine.
9. Open the valve slightly - water will begin to flow into the intestines (if there is gas and the patient feels full, it is necessary to lower the mug below the couch and raise it again after the gas has passed). Introduce the required volume of liquid into the intestines.
10. Close the valve and carefully remove the tip.
11. Leave the patient in the left lateral position for 10-15 minutes.
12. The patient has a bowel movement into the toilet or bedpan.
13. Immerse used items in a disinfectant solution.
14. Toilet the anus.
15. Remove gloves and apron; immerse them in a disinfectant solution.
16. Wash your hands.
STOMACH LASHING.
It is carried out for therapeutic and diagnostic purposes, as well as to eliminate the remains of poor-quality products and other substances from the stomach. For this procedure, a gastric tube with two holes, a funnel, and a pelvis are used.
For older children, a probe with a length of 70-100 cm and a diameter of 10-12 mm is used; for young children, a thin probe with a diameter of 3-5 mm is used. To determine the length of the probe : you can measure the distance from the bridge of the nose to the navel, and for a more accurate determination use the formula 20+n, where n is the child’s age (in years).
The position of the child depends on the age, as well as the severity of his condition. Infants are placed on their side with their face turned down. The tube is inserted to a predetermined length into the stomach. Confirmation that the tube is in the stomach is the cessation of the urge to vomit. After inserting the probe, a funnel is attached to the outer end, then the funnel is raised up and filled with a 2% solution of sodium bicarbonate (soda), after which it is lowered below the level of the stomach to remove gastric contents and this is repeated until clean lavage water comes out of the stomach. For young children, rinsing can be done using a 20 gram syringe.
PREPARING PATIENTS FOR DONATING URINE.
Preparing a patient to submit urine for general analysis.
1. Explain to the patient (parents) the purpose and rules of the study.
2. On the eve of the study, the patient must limit the consumption of foods (carrots, beets) and refrain from taking medications (diuretics, sulfonamides).
3. Do not change your drinking regime the day before the test.
4. The day before and on the day of urine collection, it is necessary to toilet the patient’s external genitalia.
5. Give the patient (parent) - if in a hospital, or explain - during an outpatient examination, how to properly prepare a container for collecting urine. To do this, you need to: wash the container with soapy water, rinse with running water at least 3 times to remove the detergent and dry thoroughly.
5. After the hygiene procedure, collect 150-200 ml of urine (depending on the age of the child) in a clean container.
6. Explain to the patient where it is necessary to leave the container with urine, closed with a lid.
Preparing a patient to donate urine according to Nechiporenko.
1. Explain to the patient (parents) the purpose and rules of the study.
2. The day before and on the day of urine collection, it is necessary to toilet the external genitalia.
3. Give the patient (parent) - if in a hospital, or explain - during an outpatient examination, how to properly prepare a container for collecting urine. To do this, you need to: wash the container with soapy water, rinse with running water at least 3 times to remove the detergent and dry thoroughly.
4. After the hygienic procedure, collect 10-15 ml from the “middle portion” of the urine stream into a clean container.
5. Explain to the patient where it is necessary to leave the container with urine, closed with a lid.
Preparing a patient to give urine for a Zimnitsky test.
1. Explain to the patient (parents) the purpose and rules of the study.
2. Prepare 8 containers for urine collection, number them and indicate the time of urine collection.
3. The patient must urinate in the toilet at 06.00 in the morning, then consistently collect urine (during the day) into numbered containers, according to the time indicated on them, changing them every 3 hours. If there has been no urination for 3 hours, the container remains empty.
4. Explain to the patient where it is necessary to leave all containers with urine, closed with lids.
PREPARATION OF PATIENTS FOR DELIVERY OF Sputum
Preparing patients to submit sputum for general analysis.
1. Explain to the patient (parents) the purpose and rules of the study.
2. Provide the patient with a container for collecting sputum (a clean, dry, wide-necked, transparent glass container with a lid).
3. Teach the patient how to collect sputum. In the morning on an empty stomach, brush your teeth and rinse your mouth thoroughly with boiled water, then take a few deep breaths or wait for the urge to cough, then cough up sputum (3-5 ml) into a container and close it with a lid.
4. Explain to the patient where it is necessary to leave the container with sputum.
Preparing patients to submit sputum for bacteriological examination.
1. Explain to the patient (parents) the purpose and rules of the study.
2. Provide the patient with a container for collecting sputum (sterile, dry, wide-necked, transparent glass container with a lid).
3. Teach the patient how to collect sputum. In the morning on an empty stomach, brush your teeth and thoroughly rinse your mouth with boiled water, then take a few deep breaths or wait for the urge to cough, then cough up phlegm (3-5 ml) into a container without touching the edges of the container with your hands or lips, and close it with a lid.
4. Explain to the patient where it is necessary to leave the container with sputum.
PREPARATION OF PATIENTS FOR ENDOSCOPIC, X-RAY AND ULTRASONIC METHODS OF EXAMINATION.
Preparing the patient for x-ray examinations.
Preparing the patient for an X-ray examination of the stomach.
1. For 2-3 days before the study - a slag-free diet.
2. Dinner the day before - no later than 21.00.
3. The study is performed on an empty stomach.
4. In the evening and morning, 2 hours before the study, a cleansing enema (see above).
5. Deliver the patient with a medical history to the X-ray room.
Preparing the patient for x-ray examination
⇐ Previous3
Stage 1: Preparation
Earwax constantly accumulates in the ear canals. The body produces a substance to trap dust and dirt particles that, if contacted with the eardrum, can damage the thin septum. During inflammation, the ears secrete a small amount of pus along with wax. Both substances mix and settle on the walls of the ear canals, preventing the absorption of droplets. For medications to work properly, you need to thoroughly clean your ears before instillation, but this procedure has its nuances.
Water should not get into the inflamed auditory organs, so you should forget about water and soap until complete recovery. Doctors recommend getting special ear swabs, which are different from regular cotton swabs. If the latter have an oblong shape and fit completely into the ear canal, then the former resemble a spinning top. These sticks have a thin tip and a wide base that does not fit into the ear.
Why such an unusual shape? Sulfur plaque covers the entire ear canal, but only the layer located at the entrance needs to be removed. The body removes the sticky substance mixed with dirt to clear the excess from the ears, and if the Q-tip is inserted too deeply, it can push the discharge back. A sulfur plug forms, which clogs the canals and causes partial hearing loss.
A cotton swab can be soaked in water or peroxide solution to disinfect the ear. It is necessary to squeeze out the excess liquid so that it does not get into the inflamed ear canal. Be sure to warm the water or peroxide to room temperature.
Carefully insert a cotton swab into the ear canal and rotate it once or twice around its own axis. If a yellowish or grayish coating remains on the tip, take a new cleaning accessory and repeat the manipulations. It is necessary that there is no wax or pus left in the ear. After hygiene procedures, throw away dirty cotton swabs, rinse your hands with antibacterial soap and take drops from the first aid kit.
Preparing to instill drops in a child
- Before use, the pipette is doused with boiling water or disinfected with special pharmaceutical products.
- For the procedure you will need several clean cotton balls.
- The drops are heated to room temperature. This is especially true for eye and ear drops. If the medicine is placed in an ampoule, you can warm it by holding it in your fist. If the bottle is large, pour a few drops into a teaspoon heated in hot water.
- Care should be taken when heating the drops. Hot medications can harm the child, and the properties of the medications change due to high temperature.
- When taking drops with a pipette, overdose should be avoided. To prevent the solution from getting into the rubber cap, the pipette should be held vertically.
- Do not forget that before the dripping procedure, the parent needs to wash their hands well.
Procedure for an adult
The treatment process for an adult and a child is always different. The same applies to the process of ear drops. To instill the drug in an adult, you must adhere to the following action plan:
Here's a video on how to properly put drops in your ears:
Important: the instilled drug must pass along the outer wall of the ear canal, since direct contact of ear drops directly on the eardrum can cause a sharp increase in pain, dizziness and a headache.
Ear pain problem
Sore ears are an extremely important issue. Moreover, only a doctor can diagnose a specific disease. After all, children’s ears can hurt for various reasons, ranging from a banal “blunt” to otitis media and more terrible diseases. And in vain, many mothers believe that the ear is very easy to treat, the main thing is to use the good old method of grandmothers, namely, applying a compress or instilling camphor oil in the ear. In fact, high-quality treatment can only be achieved if you follow the doctor’s recommendations, do not self-medicate, and know how to properly place drops in your baby’s ears.
How to put drops in an adult's ear
Preparing the ear canal and the procedure for instilling drops into the ear
When the diagnosis is definitely known and the necessary remedy has been prescribed, you can begin instillation. Sometimes there is a need to pre-clean the ear canal. This should be done as delicately as possible, trying to remove dirt only from external areas. If the procedure causes discomfort, refuse it.
The most important condition in how to properly instill drops into the ear is pre-heating the product before the procedure. Cold drops are very unpleasant, and they can also increase the inflammatory process. The easiest way is to heat them in a container of warm water. If peroxide is dropped into the ear to dissolve wax and disinfect, it can be left at room temperature. Boric alcohol should be pleasantly warm, so the warming process will begin faster.
The procedure for instilling drops into the ear:
- The patient is placed on his side, with the affected ear at the top.
- The shell of the ear is pulled up and to the side, the required amount of the drug is drawn into the pipette or the built-in dropper is used and the number of drops prescribed by the doctor is instilled.
- You need to drip so that the medicine flows down the ear canal.
- You can close the treated ear with a cotton swab, especially if you also need to treat the second ear.
- You need to roll over to the other side or get up no earlier than after 2–3 minutes, and even better, if possible, lie on your side for 10–15 minutes.
After the patient gets up, he may experience discomfort caused by the presence of fluid in the ear. This may include slight dizziness, loss of balance, a feeling of discomfort and other manifestations. In this case, you should recommend that the patient lie down quietly or sit in a comfortable, relaxed position.
Instillation of drops in children over 8 years old
After the baby grows up and reaches the age of 8-10 years, treatment for his ears will be slightly different from treatment for younger children. Therefore, parents should understand that it is best to follow certain instructions and drip the medicine correctly in order to achieve the desired result.
- First, rinse the affected ear. There should be no accumulations of sulfur in it. This can be done with a special stick with a limiter (it is forbidden to use ordinary cotton swabs intended only for cosmetic purposes), or simply rinse with water without pouring it into the ear.
- Position the baby so that the drops do not flow out of the ear, but reach the desired target. While the child is looking for a comfortable position, you need to prepare the medicine.
- There is no need to warm the drops in water or the microwave; just hold them in your palms for a few minutes. Ideally, the temperature of the drops should be 36 degrees; this will not only help eliminate the possibility of discomfort in the child, but will also increase the effectiveness of the drug.
- After this stage, you need to put drops into your ear. The main thing is to carefully ensure that the medicine does not flow back and does not remain on the walls of the ear. Therefore, you need to try to bury the product as deeply as possible, but this must be done extremely carefully.
- As soon as one ear receives a portion of the medicine, let the child lie still for 10-15 minutes. This is necessary so that the product penetrates inside and does not leak out.
- After 15 minutes, you can repeat the above procedure with the second ear. Leaving the child to lie down for a while.
Precautionary measures
Before placing drops in your child’s ears, you should take the following precautions:
- Drops are administered only into the previously cleaned ear canal. The wax or wax plug is removed because it prevents the medication from entering and the quality of therapy is reduced.
- Rinsing the ear canal under pressure is not recommended for either a child or an adult. This can damage the integrity of the eardrum.
- It is best to lie on your side for up to 15 minutes, but babies usually cannot stand that much, so cotton balls are recommended for them.
- An open bottle of medicine should be stored for as long as indicated in the instructions. After the expiration date, it loses all its properties.
- Before instilling drops into a child’s ears, you should make sure that the medicine is at room temperature (you need to instill drops at a temperature of 36-37 degrees).
- To prevent an air lock from forming, it is worth injecting the medicine along the side wall.
- It is prohibited to change the dosage or number of instillations per day prescribed by your doctor.
Putting medicine in the nose
- For small children, it is convenient to bury the nose when the baby is lying on his back. However, the procedure is carried out when the child is in a reclining position, and even when sitting with his head thrown back.
- It is better to bury the nose together to avoid injuries that may occur due to sudden movements of the baby. The assistant must hold the toddler.
- Before instillation, the nasal cavity is cleaned using a small syringe. Older children can simply blow their nose.
- When instilling drops into the left nostril, the child's head is tilted to the right. Otherwise, it's the other way around.
- After filling the pipette with the drug, place its tip in the prepared nostril and inject a few drops. You should hold the baby's head so as not to damage the baby's mucous membranes and cause pain.
- You should hold the baby in this position for some time (one minute is enough) so that the drops can spread to the nasal mucosa.
- After this, you can proceed to instillation of another nasal opening.
The bottle of medicine should be stored tightly in the refrigerator. Do not use medications after the expiration date, as the medications may lose their healing power. The procedures must be carried out very carefully so as not to cause not only physical, but also psychological trauma to the child. If possible, you should use the services of an assistant, which will reduce your own fears and eliminate mistakes during procedures. A calm mother means a healthy baby!
After instillation
Before instilling drops, your doctor should explain what side effects they have, since some medications can be ototoxic. You should consult a doctor immediately after instillation if there are negative changes in your condition.
After instillation, you need to very carefully monitor the appearance of allergic reactions (burning, itching, redness, swelling, difficulty breathing), and immediately contact your doctor if at least one of them appears. You should definitely see a doctor if your condition worsens over the next few days after instillation.
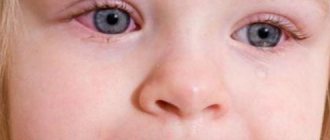
People often mistakenly put ear drops into their eyes due to the fact that eye drops and ear drops are very similar in appearance . If this happens, the eyes will immediately begin to burn, then redness and swelling may appear. In most cases, eye problems caused by ear drops are temporary, but there is still a risk of visual impairment.
It is worth noting that some eye drops can be successfully used for ear diseases. But you should always remember - you should never use ear drops for eye drops. Sometimes it is possible to instill drops into the nose, eyes and ears of medicine from one bottle. These drugs include the steroid drug Betnesol, which relieves inflammation.
Children often suffer from ear diseases, which in most cases can be treated with drops. Therefore, it is important for every parent to know how to properly put drops in their baby’s ear. Let's consider the preparation rules and the algorithm for carrying out this process, as well as what precautions should be taken.
Contraindications for use
Depending on the active substance, some medicinal drops cannot be used by children due to their ototoxic effects. Before three years of age, you should not use Candibiotic, Sofradex, Tsipromed. Individual intolerance to individual components is also a contraindication.
During pregnancy, Polydex or Otofu is prescribed with extreme caution. You cannot use Normax, Annauran, Sofradex. These same drugs cannot be used for purulent lesions. Because if they get into the middle ear, they can cause hearing loss.
After administering ear drops
- Beware of signs of allergic reactions (burning, itching, redness, swelling, difficulty breathing) and call a doctor immediately if you suspect any of the symptoms.
- If you feel worse after using ear drops, call the hospital.
It is important to consult your doctor when using ear drops. Using the wrong drops for a perforated eardrum can cause hearing loss. However, in other cases, ear drops are an excellent way to quickly relieve symptoms. Remember that the process of treatment under the supervision of a specialist will help you faster on the path to better health.
Aloe for ear congestion
Aloe (agagave) is a plant with a wide range of medicinal properties. It has an anti-inflammatory effect, accelerates regeneration processes, and works as an immunomodulator. The bactericidal effect of aloe is manifested against streptococci, staphylococci, dysentery and diphtheria bacilli.
Aloe juice is effective in the treatment of otitis media, lesions of the Eustachian tube, sinusitis, and runny nose. It is used for burns, eczema and many other pathologies. The plant quickly relieves pain in ear diseases, stops the inflammatory process and relieves swelling.
To prepare the medicine, take an aloe leaf (the plant must be older than 3 years), peel it. Carefully collect the gel with a spoon and strain through cheesecloth. Place the resulting juice 2-3 drops into the affected organ. Treatment is carried out for 4 days.
Precautionary measures
When using drops, keep the following precautions in mind:
- Do not increase or decrease the dosage of the drug indicated by the doctor.
- You cannot extend or reduce the period of use of the drug.
- You cannot replace one drug with another, even if their effect is similar. Only a doctor can choose the most suitable remedy and regimen for your case.
- You should not use several drugs at the same time. If the doctor prescribed 2 types of ear drops at once, then wait 15-20 minutes between procedures.
- If side effects are noticed during the use of the product, for example, a rash, burning, redness of the skin appears, you should immediately stop using the drug and consult a doctor.
All drugs can be divided into several types: painkillers that relieve inflammation and swelling, eliminate pathogens, hormonal and non-steroidal drugs, as well as drugs for softening and removing wax plugs. In most cases, all these medications give the first tangible results after the first use. But the desired therapeutic effect can be obtained from them only if you follow all the recommendations of the attending physician.
This is a very interesting situation.
The main treatment for treating various ear diseases is instillation of medications into the ear. But many people don’t even know how to do it correctly!
The main difference between instilling medicine into the ear is that the vestibular apparatus is located in the ear, which ensures a person’s balance. Most people know this.
But very few people know that the vestibular system reacts strongly to a temperature stimulus. If instilling too hot medicine can cause a burn to the delicate mucous membrane of the ear, then when cold medicine gets into the ear, severe dizziness occurs due to irritation of the vestibular apparatus.
Therefore, instilling certain medications into the ear requires a certain technique.
In a nutshell, the trick is to heat the medicine to the right temperature. This can be done quite simply.
If you must administer ear drops from a bottle, then fill a small cup with hot water (not boiling water!) and place the bottle of medicine in it.
If you need to drop, for example, vegetable oil into your ear (this is done to soften wax plugs before washing your ears), then you will have to heat it a little differently.
Heat a regular tablespoon (empty) on the stove. Heat it for about 10 seconds. Pour oil into an already heated spoon and wait a few seconds so that it has time to heat up (you will see how a drop of oil begins to spread over the spoon when heated :))
After heating, draw the medicine or oil into a pipette and be sure to check the temperature! To do this, place a small drop on the back of your hand. If the medicine is not hot, then it is quite possible that you will not even feel its heat (that is, it is at body temperature, and you can safely drop it into your ears).
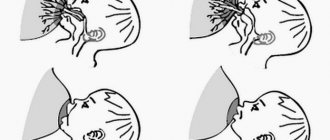
The medicine should be instilled while lying down or sitting. Under no circumstances should you drip medicine into your ears while standing because of the risk of the patient losing balance and falling!
Tilt your head in the direction opposite to the ear into which you will drip the medicine. Take the top of the ear and slightly pull the ear up and back, that is, towards the top of the head. At the same time, the ear canal opens better and straightens. Instill the medicine as prescribed (usually 2-3 drops), then release the ear and lightly press the tragus (the growth on the front of the ear) several times so that the medicine goes deeper into the ear. Let your head remain in an inclined position for at least another 10-15 seconds.
After this, you can turn your head and drop the medicine into the second ear in the same way.
Wipe off excess medication inside the ear with cotton wool or a paper towel.
The most important thing, I repeat! — don’t forget to check the temperature of the medicine on your hand!
As is known, doctors prescribe ear drops to their patients to treat inflammatory diseases. And although today there are many high-quality and effective drugs in the pharmacy, it will simply be impossible to get the desired effect from therapy if the instillation process is not performed correctly. And although it may seem to many that there is nothing complicated in this matter, in reality everything is a little different. There are a number of features that must be taken into account when instilling in the ear, eyes and nose.
Instilling drops in a small child
You need to be extremely careful with small children. This point of treatment is the most important. Do not forget that babies also have differences in the structure of the auricle. So, the rules for instilling medicine into the ears of babies:
- Clean the ear with a small damp swab.
- Place the baby on his side so that he is as comfortable as possible and does not roll around.
- Place a few drops of the medicine in a special pipette. Just remember to reheat it in the same way as described above.
- Gently grasp the shell of your baby's ear and pull it down to help the medicine flow through your baby's ear.
- Carefully, without inserting the pipette deeply, drop the medicine.
- Cover the ear with a cotton pad and let the baby lie there for 10-15 minutes.
If you follow all the rules and instill the medicine into your baby’s ears correctly, you will not only be able to cure the baby, but also not harm him with your inept actions.
Preparation stage
First, wash your hands thoroughly with water and liquid soap. Dry with a clean towel. The instructions for use stipulate that the pipette must be boiled to ensure sterility of the instrument.
Cleansing the external auditory canal from serous accumulations:
To treat and get rid of phlegm, our readers successfully use a natural remedy for phlegm. This is a 100% natural remedy, which is based exclusively on herbs, and mixed in such a way as to combat the disease as effectively as possible. The product will help you quickly and effectively overcome a cough in a short time, once and for all. Since the drug consists only of herbs, it has no side effects. Does not affect blood pressure or heart rate. Get rid of phlegm..."