Of course, in the modern world you can find absolutely any product for people of different ages. The same applies to products for babies, especially various educational toys. However, many mothers still try to make toys for their babies themselves, and this is quite understandable.
A toy made with your own hands has a special format and gives confidence in safety. You know exactly what materials were used to create the toy and exactly what method was used to make it.
Most mothers probably already know exactly how certain hypoallergenic toys are made that will definitely delight the baby.
Do-it-yourself toys with patterns for kids can be easily found online. For those who have just decided to try making something interesting for their child, there is a whole collection of useful tips and ideas.
In this material you will find several detailed master classes on creating development projects of an interesting nature.
The main stages of child development
Before you start making a toy, determine what age it will be designed for. Obviously, a toy for a one-year-old child will not be of interest to a five-year-old. It is also important what the child is interested in. It depends on what shape your toy will be and what plot it will be combined with.
I would like to remind you that everything is individual. Perhaps your child has already mastered some skill ahead of time, perhaps not.
0— 3 months
The child lies on his back most of the time. It is necessary to develop the ability to focus your gaze.
Types of toys:
mobiles, bright rattles, garlands, beads.
Requirements for toys:
different textures, lightness of toys, simple shapes. The colors are bright, but not variegated. Preferably no more than 5 items.
3 – 6 months
The child moves more and puts all objects in his mouth. Learns to roll over from back to stomach. It is necessary to develop coordination of movements, hearing and vision, and grasping skills.
Types of toys:
tumblers, rag beads, toys with a mirror, rattles - dumbbells, rings. Educational mats with arcs. Rag balls, button bracelets.
Requirements for toys:
bright, different-textured toys that make different sounds.
6 – 9 months
The child learns to crawl and recognizes loved ones. For some time he is able to entertain himself. It is necessary to encourage motor and speech activity, as well as develop the ability to grasp an object not with the whole hand, but with two fingers.
Types of toys:
educational mats, sorters, pyramids, nesting dolls, musical toys with buttons.
Requirements for toys:
bright, sounding toys should differ in shape, weight, and method of use.
9 – 12 months
The child learns to walk and talk. It is necessary to develop motor and speech activity.
Types of toys:
educational rugs and picture books, rolling toys, dolls with pronounced facial features, glove and finger puppets, pyramids, cubes, sorters, variants of boxes, buckets, baskets (insert toys).
Requirements for toys:
toys consisting of different parts that can be assembled and disassembled. Toys that reflect real world situations.
1 year – 1 year 3 months
Active development and exploration of the surrounding world begins. The child shows a desire for independence. It is necessary to develop motor and speech activity, as well as thinking operations: comparison, generalization, analysis.
Types of toys:
pyramids, cubes, insert toys, musical instruments.
Requirements for toys:
toys consisting of different parts that can be assembled and disassembled.
1 year 3 months – 1 year 6 months
Development of speech, encouragement of speech activity, development of fine motor skills (unfastening - fastening in various ways). Development of the operation of thinking.
Types of toys:
educational mats and books, cubes, toys with a surprise (secret), sorters.
Requirements for toys:
toys that allow you to generalize objects based on similarity, size, color. Names of animals, plants, clothes, etc.
1 year 6 months – 1 year 9 months
Active knowledge of the surrounding world. It is necessary to develop the active use of objects for other purposes, independent play, and understanding of emotions.
Types of toys:
toys that reflect real situations and objects of the surrounding world, animals.
Requirements for toys:
subject games (story, construction, etc.). Toys that require you to show and name colors, shapes, and choose an action.
1 year 9 months – 2 years
The child is undergoing active social development. It is necessary to develop an understanding of shape, color, size.
Types of toys:
sorters, pyramids, cubes, books.
Requirements for toys:
toys that can be grouped by shape, color, size.
2 - 3 years
The baby’s active social development continues; he already knows how to interact with other children. It is necessary to develop fine motor skills, as well as the ability to distinguish shapes, colors, and sizes.
All types of toys. Crafts made from natural materials, paper, plasticine.
Requirements for toys:
toys for subject, role-playing games.
35 years
Activity, the ability to independently organize your play activities. These skills need to be strengthened.
Types of toys:
children's lotto, puzzles. Games for learning the time of day and seasons. Learning the alphabet and numbers.
Bracelet
This is a DIY rattle that can be attached to a child's hand. For the product you will need:
- high-quality fabric of four types (pieces);
- small buttons (for eyes);
- Velcro fragment;
- needle with thread;
- balls from an old rattle;
- a ribbon made of soft dense fabric is the base of the bracelet;
- padding polyester for filling the head.
- First you need to sew a bracelet. To do this, the circumference of the child’s hand is measured and its width is determined. When measuring, add 4 cm so that the toy can move freely, plus 3 cm for Velcro. The width should be about 3 cm.
- The fabric is sewn from the inside out. A thick tape is placed inside. To secure it, you can stitch it in the middle.
- Velcro must be sewn to the edge. The bracelet itself is ready.
- Your task is to decorate it by sewing on the animal’s head. For it you need to draw a pattern, do not forget about the need for two parts of the head and four ears.
- The ears are sewn from the inside out, turned outward and ironed.
- To make the muzzle voluminous, you need to make two grooves on the sides.
- A nose and eyes are sewn to the face, and a mustache and mouth are embroidered.
- Now you need to sew on the ears, sew the back and front of the head. Don’t forget to leave room for placing padding polyester and rattle balls. After this hole you will need to sew up and attach the head to the bracelet.
Materials for making educational toys
There are a huge variety of materials for making educational toys, most of them are found in every home!
Remnants of fabric
Educational toys are good because you can use leftovers that every needlewoman has for them. For example, the remains of various fabrics, felt, fleece, knitwear. Different textures are welcome!
Want to make your life easier? Use small pieces of fabric that are applied to new suits.
Those who know how to knit can use squares that are knitted to calculate the stitches.
How to make sensory bags?
- This toy enriches the baby with new tactile experiences. The different contents of the pouches provide many different sensations for little fingers.
- The bags can also have another purpose: the baby can walk on them, which makes it possible to massage small heels. Pads can also be thrown.
- The mother can invite the baby to play sensory lotto, looking for bags filled with the same filling.
- You can sew letters from felt or other fabric onto the bags. When the baby gets a little older, the craft can be used while teaching numbers and simple math problems.
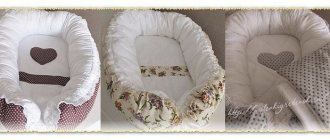
Sensory bags
Fish made from sensory elements
Sensory bags with sewn numbers
Balloons can be used to make sensory bags. The only difference is that sensory bags are made faster and easier from balloons, and flour and salt can be used as a filler.
- We use flour, pebbles, and beads as filler for the sensory bag. Anything that has sharp edges, even if it is pasta, is not suitable for educational toys.
- You can throw 1-2 beans into the ball along with the flour so that the baby can look for them with his fingers.
- The sensory bag, which uses a balloon as a base, will last a long time. In children's centers, for example, such a short-lived toy at first glance is preserved in its original form for a long time.
Balloon sensory bags
Sensory bag with transparent window
You can fill the sensory bag with pasta without sharp edges
What types of educational toys are there?
On the Internet you can find a huge number of educational toys made by yourself: books, cubes, panels and rugs, pillows, stands, houses, animal figures, etc.
Educational house and animal puzzles
The plots are also varied. It could be some kind of children's fairy tale or just a picture with a plot.
Remember, for example, what your boy is interested in: cars or trains?
Variants of books “about a baby” are interesting - they not only develop motor skills, but also help the child to better understand the world around him.
Or maybe it will just be a cube with some elements? The choice is yours.
All toys can be divided into 2 large groups : those that a child can play with independently and those that require help or the presence of an adult . Typically, the first category includes entertaining toys for children in the first months of life, as well as toys that develop fine motor skills. After several demonstrations, the child will be able to independently unfasten a zipper or button, unscrew the cap, etc.
The presence of an adult requires toys that develop the ability to count; find more-less, right-left, up-down; name colors and geometric shapes, parts of the body or animals, explain the rules of behavior or traffic, etc.
Octopuses
In order to create such a rattle, you must have knitting skills. You will need:
- egg from Kinder Surprise;
- needle;
- sewing threads;
- 6 balls;
- cereals or beads;
- two small buttons;
- multi-colored yarn.
- The Kinder egg contains grains or beads that will give the sound to the rattle.
- The knitting process begins with four loops, then knit in the round.
- You can change the colors to make the toy more interesting.
- All knots are tucked inside.
- Constantly try on products to match the Kinder egg.
- When knitted to the middle, you need to start reducing the number of loops.
- At the end we leave a hole into which the capsule can be inserted.
- Sew buttons in place of the eyes.
- Insert the capsule into the case and sew up the bottom.
- The balls are tied to the octopus's body using multi-colored threads.
Options for toys and the skills they develop
Baby rattle bracelet
This bracelet will be useful for a very small baby (from 2 to 4 months). It will contribute to the development of the baby's hearing and vision, as well as coordination of movements.
Beads (sling beads)
Sling beads develop color perception, tactile sensations, and teach the child to pick and roll small elements. In addition to beads, you can attach several small knitted animals or fruits.
Pillow with buttons
Despite its apparent lightness, the toy is quite interesting. Buttons of different textures develop the baby's tactile perception. Take it with you on the road and ask your child (depending on his age) to find all the buttons of a certain color, count them (on the entire pillow, in one row or column), find the largest or smallest button of a certain color in a row or on the entire pillow, show which button is to the right of the small blue one, etc.
Book
Develops fine motor skills, teaches you to name animals, allows you to study colors and geometric shapes.
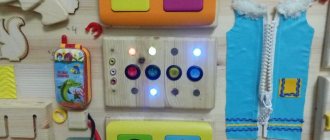
Stand with locks
I'm sure the boys will be absolutely delighted! After all, there is so much that can be opened, unfastened, turned and pressed. Making a development stand is quite simple; most of the elements can be found in any man’s pantry.
The rug is a fairy tale
The rug develops the child's speech and imagination. Simple guiding questions from parents will help the child quickly master these skills (Can you imagine that Kolobok turned the other way? Who will he meet? Etc.)
Do not forget that any fairy tale is also another reason to remind you of the rules of behavior (that you cannot run away from your parents, that you must obey your elders, be diligent and hardworking).
How are homemade toys useful for a baby?
- Toys for the development of fine motor skills, made by the hands of a mother or grandmother, are heartwarming and great. After all, the efforts of the loved one and his care are passed on to the baby.
- Nowadays in children's stores you can find toys for any budget, but even with such variety, sometimes you cannot get the necessary educational toy.
Educational textile toys
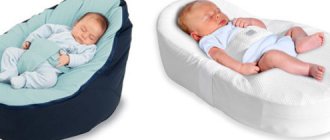
A sensory box is one of those fun things for a baby that has so many benefits for little fingers: you can fill the box with simple cereals, water, shreds, and pasta. The only condition: the baby must exercise under the supervision of mom or dad.
Sensory box for baby
Sensory box "vegetable garden"
Parents will need a little effort and imagination to make an educational toy for their child. For example, the road below is made from cardboard, bottle caps, paint, old photographs and magazine clippings.
Educational toy "road"
- Another reason for creating educational toys with your own hands is the rapid loss of attention to new toys on the part of the baby before he reaches the age of 1.5 years. They only need a few minutes to study the proposed toy and consolidate the information received. After this, the baby switches to something else in search of new knowledge.
Washing, ironing, cleaning, the husband demands attention, the child did not sleep all night... what toys could there be? When to do them? Let this become your kind of relaxation, organize a family craft project or hand the baby over to dad, and lock yourself in the kitchen and create!
Homemade toys are needed not only by the baby, but also by the mother! This is her little “relaxation”, because needlework is so calming. The little rattle will be full of your love, and, therefore, the baby will like it.
Why is it worth driving away laziness and making a toy for your baby with your own hands?
- Many useful toys are not sold in stores. For example, a sensory box that develops fine motor skills of a baby’s hands so well.
- The youngest children enjoy a new toy for only a few days, and then lose interest in it, but a handicraft mother can create “new items” every day.
- This is simply profitable, because a toy made from improvised materials costs hundreds of times less than a store-bought one.
So let's get started!
- Balls, bagels, balls!
- Baby sling beads - a toy for walking
- Beads-gnawers
- Octopus in half an hour
- A funny snake...from a sock!
- Ring with ribbons
- The first rattles from improvised means
Montessori at home: 48 activity ideas
To make such a cube you will need: 6 equal squares of fabric of different colors, padding polyester or foam rubber for filling, non-woven fabric, various accessories - buttons, ribbons, scraps of fabric, brooches, etc., thread, sewing machine.
You need to cut 6 equal squares from the fabric.
From non-woven fabric, you need to cut squares 1.5 cm smaller than fabric ones. We apply them to the fabric and heat them with an iron so that the interlining sticks to the base.
Each side of the future cube needs to be decorated: make an applique from scraps, sew on beads, snakes, buttons, and so on. The easiest way is to draw a design with a disappearing marker, and then lay it out on the fabric. For example, like this.
When the decorative part is finished, you need to sew 4 squares into one strip.
Then we sew on two more squares.
All stitched seams must be secured and stitched along the contour of the non-woven edges. We sew a development: two edges need to be joined, and the allowance of the third should be folded inward.
You need to leave a hole in the corner of the last edge: turn the finished product inside out, stuff it with padding polyester and sew it up with a hidden seam. You can also put a bell or rustling paper inside the square. The product is ready!
Master classes on creating educational toys with your own hands
Here are some master classes and examples of educational toys that are presented at Krestik
:
How to make toys for babies with your own hands
- How to make a mobile into a crib
- DIY rattles for newborns
- How to sew a developmental cube for a child
Now in stores there is a huge number of all kinds of children's toys for every age and taste. But homemade “developmental toys” for kids do not lose their popularity among creative parents. You can make anything you want with your own hands - mobiles and crib pendants, all kinds of rattles, comforters, soft toys, educational rugs, books and much more.
Top 7 DIY toys for babies
- The baby will hold such a toy in his hands, fingering the tentacles. To make a toy you only need half an hour of free time.
- To create a simple octopus you will need a piece of fleece or other bright dense fabric, filling (sintepon, holofiber), and buttons. You will also need scissors, thread, a needle, and thread.
- We cut the corners of a square piece of fleece at right angles. We cut the edges with fringe. We assemble the middle, filling it with padding polyester. We wrap the resulting ball with thread from below or fix the round shape with an elastic band. We braid the fringed edges into braids.
Educational octopus toy
How to make a simple educational octopus toy
DIY rattles for newborns
You can also make rattles for babies yourself. It's not difficult at all. Here are the simplest ideas:
For a small child, it is better to find a small bottle (0.25 l) so that it is not difficult for him. This toy will perfectly develop your little one's hands.
Toys of a more complex design will also be within the power of even novice needlewomen.
How to sew a rattle bracelet
To work you will need:
- Scraps of felt or fleece fabric – 9 pcs. different color.
- Threads in color (you can take floss).
- Sintepon (holofiber is also suitable).
- Velcro for fastening.
- Adhesive fabric.
- Needle.
- Scissors.
- Iron.
- Pencil or chalk.
- Cardboard or pattern paper.
- A bell to make the rattle ring (you can use a part from old toys or a fishing bell).
Progress
1. First you need to make patterns - a strip for the bracelet (16 cm x 2 cm), circles for the middle of the flower (5 and 3.5 cm in diameter), a piece for the petal.
2. Now you need to transfer the patterns to felt. For the bracelet, petals and circles, you need to make allowances to sew the blanks.
3. From the adhesive fabric you also need to cut out a 3.5 cm circle and two parts for the bracelet, but without allowances. 4. Glue the felt parts with adhesive cloth, after moistening it with water. 5. Sew the petals by folding the pieces in half, turning them inside out, and stuffing them with filler. 6. Sew the bracelet (do not sew up one short side), turn it inside out, and sew up the hole with a blind stitch. 7. Sew on the Velcro. 8. Next, you need to sew a small circle to the middle of the bracelet with the adhesive side up. 9. Now you need to sew all the flower petals to it. 10. Sew a large circle on top of the petals, making it voluminous. Leave a hole, fill it with padding polyester and put a bell in the middle. Sew up the hole.
Rattle from a bottle
First method: bottle with colored water
- Fill a clean bottle 1/3 full with vegetable oil. Fill 2/3 of the bottle with plain water colored with food coloring.
- The neck of the container is coated with superglue and the bottle is closed with a lid.
Bottle with colored water
Bottle with various fillings
Second method: search bottle
- The container is filled one third with rice. Small toys, beads, and pebbles are thrown inside.
- The neck of the bottle is smeared with glue and closed with a lid. The baby will shake the bottle and look for objects hidden inside.
Search bottle
Baby will love pushing the bottle and watching it roll
Third method: bottle-sea
- One third of the container is filled with shells, sea stones and sparkles. The bottle is filled with water to the very top. The neck is coated with superglue and closed with a lid.
- You can use a jar instead of a bottle. Fill it with glitter, shells and water. The neck is also lubricated with glue and the jar is closed with a lid. You can fill the jar with any bright small details, buttons.
Sensory bottles: with sand, with colored water, with shells
Sensory bottle with different contents
Sensory bottles: how to fill them
Sensory bottles
This is the simplest option. You will need to place, for example, buckwheat in the Kinder Surprise egg and close the capsule well. Some parents stop there, but for the safety of the baby, it is better to cover the egg with a cover. To do this, you can use fabric or knit a shell of yarn using a hook.
- You will need a plastic jar or bottle, but not glass. It is advisable to use a transparent container.
- Sequins or multi-colored beads are poured inside.
- Carefully secure the lid without using glue, for example, by fusing the plastic lid with a fixing ring; you can also crochet or sheathe it.
- Now you need to make a cover that matches the size of the container and tighten it around the neck.
Guide The VillageChecklist: What toys does a child under one year need?
Pediatricians - how to choose activities for children
- Masha Shatalina, February 13, 2019
- 161229
Wired magazine has a immortal article that pops up from time to time in parent publications and chat rooms. According to her, the coolest toys of all time are sticks, boxes, ropes, cardboard tubes and dirt. We are sure that this is true - but for older children. What to play with for those who are not yet able to get themselves a stick or make a castle out of mud? We talked with pediatricians and compiled a guide to educational toys for children under one year old. We try to protect you from the temptation to buy everything you like, and tell you what will really be useful.
Anna Igoshina
pediatrician, physiotherapist of the highest category, head physician of the Medica clinic
Roman Shiyan
pediatrician at DocDeti clinic
Four questions that parents are interested in
How many toys does a child need?
Roman: For healthy development, children need to play a lot. But toys are not necessary for this. In any home there is a large number of objects for play: pots, spoons, books and so on. You can make toys with your own hands. The simpler the toy, the more imagination you need to use to play with it and the greater the need for moms, dads, brothers and sisters to participate in the game. There is no minimum required number of toys. However, a recent study found that the fewer toys a child has, the longer and more creatively he or she plays with them, while having too many toys significantly reduces the quality of play.
How to choose a toy?
Roman: For children of any age it is worth choosing simple toys. The more functions a toy has, the less action is required from the child when playing with it. If a child simply sits and watches the toy perform its functions on its own, the benefit from such a toy is little greater than from watching TV.
Anna: Toys should be large and whole, without small elements, chips, scratches or unpleasant odors. There should not be many of them so that the child learns to concentrate on one subject. Rubber toys should be dense and should not crumble. Painted toys must be rubbed with your hand before purchasing: if a trace of paint remains on your fingers, you should not buy them. Toys should be made of different materials: rubber, soft and plastic. Before first use, plastic and rubber toys must be soaked in a solution of baby soap, textile toys must be washed in baby powder.
Do educational mats provide development?
Roman: From the age of three months, children really enjoy spending time on educational mats - there are a lot of interesting things there that captivate the baby. A child can be left to himself on it for a long time, so mothers often use the rug to get a little distraction and go about their business. It's convenient and you can definitely use it. However, we should not forget that from the point of view of a child’s development, the rug is not so “developmental”. It is important to remember the main principle of healthy development: the child first of all needs interaction with other family members.
Do you need gadgets for up to a year?
Roman: Until one year of age, a child does not need interactive electronic toys or educational applications on smartphones and tablets. They distract him from the social interactions necessary at an early age. Being carried away by such a toy, the baby does not see the expression on the parents’ faces, their gestures, and misses the phrases addressed to him. Numerous studies show that electronic toys lead to a decrease in play interaction between parents and children, later development of speech and mental abilities, and a decrease in motor activity.
Necessary materials
It’s not difficult to make educational crafts for children with your own hands, and the materials for them can be found in every home:
- Scraps of fabric - it is preferable to use natural material. It is desirable that the texture of the fabrics be different. You can use felt, calico, silk, knitwear, fleece.
- Threads - leftover yarn will do. It’s great if they are multi-colored, different thicknesses and textures.
- Colored paper and cardboard. It is not necessary to buy cardboard; you can use packaging material or boxes.
- Wood is an excellent natural material for making construction sets, cubes, blocks, and sorters. But working with it requires skills and tools.
- Other elements are furniture fittings (hooks, latches, latches), foil, bags, plastic bottles, bubbles.
- Sewing accessories - ribbons, beads, laces, zippers, Velcro tape, buttons, thermal appliques.
- Filling - in addition to traditional padding polyester and foam rubber, rustling and rattling cereals, pasta, salt, acorns, and dried cherry pits are used to fill children's toys.
When using small items such as buttons, beads, snaps, make sure they are sewn on tightly. Before giving the toy to your child, check how the clasps open, the buttons, zippers, and buttons are undone, and how tightly the seams are sewn. When making toys, do not use brittle or sharp objects.
Dear needlewomen, you can make your own toys from various materials: scraps of fabric, yarn, old clothes. Using a variety of accessories (Velcro, large buttons, zippers, buttons, buckles, stripes, etc. - the main thing is that the child cannot tear them off and put them in his mouth), candy wrappers, cereals, pasta, bells, foil, fillers such as foam rubber or padding polyester and other things.
- You must understand that the basis of household rattles is some kind of container and rattling filler. For this purpose, you can use kinder eggs, balls, and bottles. As for the filler, it can be beads, cereals, buttons, peas, small pebbles.
- When deciding on a capsule, you need to take into account the size of the future toy.
- For good sound, it is important to choose a durable container with hard walls.
- You must understand that how a toy will sound depends on the amount and type of filler.
- You may also need:
- yarn;
- colored threads;
- knitting needles;
- needle;
- scissors;
- buttons (future eyes);
- textile.
How toys change from birth to one year
Newborn
Anna: The first month of a child’s life is a period of adaptation to the world around him. The most important role here is played by the newborn being together with his parents or adults caring for him. During this time, the child will learn to turn his head in different directions, focus his gaze on a stationary object for a few seconds, and respond to the voice of loved ones.
Roman: The life of a baby during this period is quite simple. All that really matters is to eat well, sleep well, have a clean diaper and lots of maternal warmth. The baby's vision is not yet sufficiently developed. Children at this age are best at recognizing human faces, so making faces is a great game. The child may even copy your facial expression. At this age, the baby can already distinguish contrasting colors at close range, so a pair of bright rattles may be useful for play.
The baby's hearing is also not yet sufficiently developed, but he already recognizes the sound of his mother's voice. Talk to your child as much as possible, tell funny stories, ask questions, sing songs, imitate the sounds he makes. The baby has well-developed tactile sensitivity. So pick him up, rock him, stroke him, do light exercises and, most importantly, provide plenty of skin-to-skin contact.
Soft toy with a surprise
To create such a rattle, you need to sew a rattling object into a soft toy. These could be metal bells or a kinder egg with peas. The main thing is that the object makes some sound. It will be even more interesting if the child has a plush friend consisting of several parts. So you can sew filling with cereal into one part, beads into another, a strong rattle into the third, and crispy polyethylene into the fourth. This way, the child will be able to play with the parts of the plush friend and listen to different sounds.